- Overview
- Drag partitions to the destination disk or click 'Copy Partitions'
Overview
First, it is important to discuss what a disk clone is and how it differs from a disk image. Whereas a disk image will copy all of the sectors from the source partitions to a compressed file that can be restored at a later point in time, a disk clone will copy the partitions uncompressed directly onto the destination drive.
Once a disk clone has been completed, the source partitions will have been copied 1:1 onto the destination (although it is still possible to modify partition properties during a clone). As a result, this makes cloning perfect for scenarios like upgrading to a larger or newer disk, as well as having a "hot-swappable" copy of a disk that can be rapidly connected if the source disk fails.
Disk cloning is a destructive process, meaning that partitions on the destination disk can be deleted during a clone process. If you are looking to be able to recover a system following a disaster, a disk image may be more appropriate.
Deciding what to Clone
A graphical view of the disks that are connected to the system where Reflect is installed, and the partitions on those disks, can be viewed on the 'Local Disks' tab nester under the 'Create Backups' tab. System partitions, partitions that contain operating system data and are required for the operating system to work correctly, are denoted by the Windows logo in the top-left of the partition.

First, it is important to decide which disk, and which partitions from the selected disk, will be cloned to the destination disk.
Next, select the disk that will be the source of the clone, then select 'Clone this disk...'.
The Clone Wizard
Drag partitions to the destination disk or click 'Copy Partitions'
The 'Clone' wizard will then open. In the window that opens, the destination disk can be selected with the 'Select a disk to clone to...' button:

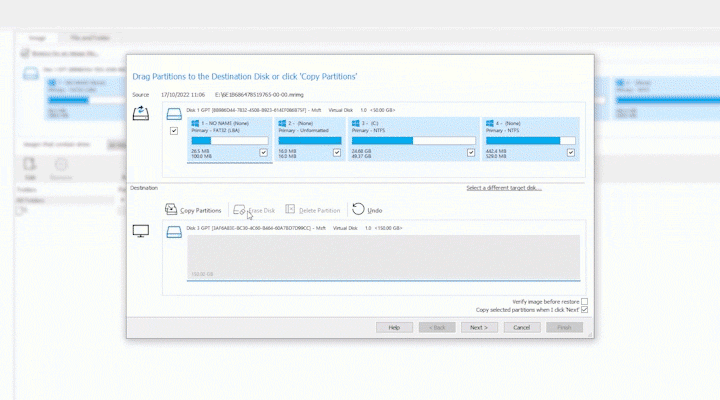
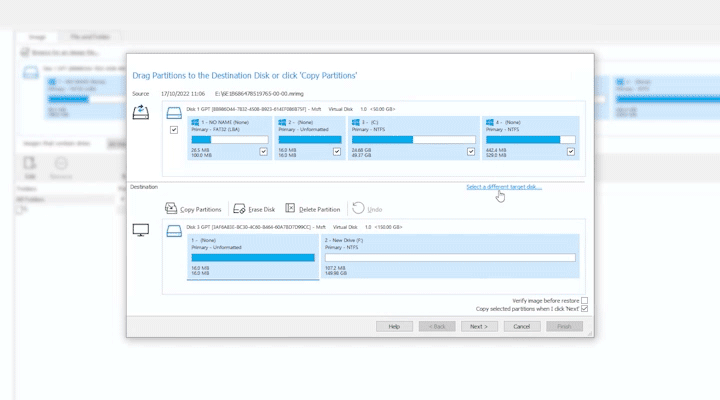
The source and destination disk can be changed at any time using the 'Select a different source disk...' and 'Select a different target disk...' buttons:

Once the source and target disks have been selected, partitions can be deleted from the destination disk using the 'Delete Partition' button, or all partitions can be deleted using the 'Erase Disk' button:
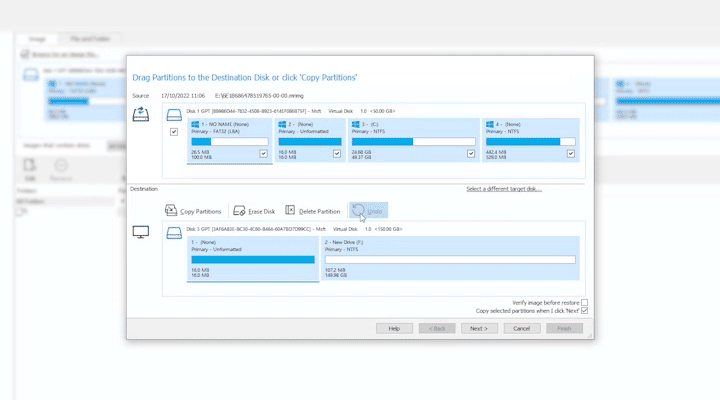
Partitions can then be dragged from the source disk and dropped onto the destination disk:
Alternatively, the 'Copy Partitions' button can be used to easily copy all the selected partitions from the source disk to the destination.
If the destination disk for the clone is a different size from the source disk, the following options will be displayed:
'Exact partition size and offset' - Selected partition(s) will be copied to the target maintaining the starting positions and lengths, from left to right. If the disk is smaller than the end of the last selected partition, then the last shrinkable (NTFS or FAT32) partition is shrunk to enable all partitions to be copied.
'Shrink or expand to fill the target disk' - Selected partition(s) will be copied to the target and all extendable/shrinkable partitions will be proportionately resized so all partitions fill the disk. Extendable and Shrinkable partitions are all non-system partitions, and drive C, formatted using either NTFS or FAT32. Note in the example below that the C: drive has been expanded to fill the extra space on the destination drive.
No partitions will be deleted or modified until the clone process has started. Any changes made on this page can be undone or canceled.
More information about modifying partition properties during a clone can be found in this article.
Schedule this Clone
On the next page of the wizard, the clone can be scheduled to run automatically. This can be especially useful if the clone is being performed to a "hot-swappable" drive for disaster recovery, scheduling the clone can help ensure that the "hot-swappable" drive is kept up-to-date with any changes being cloned from the source disk.

Select 'Add Schedule'. In the window that opens the 'Frequency' and 'Options' for the schedule can be changed. The list of options on this page will change depending on the 'Frequency' that has been selected:
 |
 |
 |
 |
 |
 |
Selecting 'Conditions' will display additional options that can be used to determine whether the task should run:

| Option | Description |
| Run task as soon as possible after a scheduled start is missed | If a scheduled start is missed, e.g. due to the system being powered off, the scheduled task will start when it's next possible. |
| Start the task only if the computer is on AC power | The task will not start if the computer is on battery power. |
| Stop if the computer switches to battery power | If the computer switches to battery power during the clone, the clone will stop. This option is only available if Windows Task Scheduler is selected in the 'Schedule Settings'. |
| Wake the computer to run this task | When selected, the system will attempt to wake from sleep to run the scheduled backup. |
Any triggers that have been created are displayed on the 'Schedule this Clone' page. Triggers can be edited and deleted by selecting a trigger and then selecting one of the options below the triggers table:

Clone Summary
The final page of the wizard shows a summary of the clone that is about to be performed. Since cloning is a destructive process, we recommend double-checking the settings that have been selected. The '< Back' and 'Next >' buttons can be used to navigate through the wizard and make changes as necessary.

'Advanced Options' can be selected on any page of the wizard, to specify advanced options for the clone that will be performed. Read more about the available options here.
Backup Save Options
After selecting 'Finish', the 'Backup Save Options' window will be displayed with options to 'Run this backup now' and 'Save as a Backup Definition File'.

If 'Run this backup now' is left unchecked, the backup will run at the next scheduled start time, if a schedule was specified, or can be launched manually on the 'Definition Files' tab:

'Save as a Backup Definition File' must be left checked if a schedule has been specified. This option can still be left checked if a schedule has not been specified to make manually running the same backup again in the future easier, as shown in the screenshot above.
When the clone runs interactively, if a drive is going to be overwritten, the following window will be displayed. This window shows a list of the drives that are going to be overwritten and a confirmation checkbox that must be checked before the clone will start:

Viewing the Cloned Disk
Once the clone has been completed, the 'Local Disks' under the 'Create Backups' tab can be used to view the new layout of the disk:

If the new layout is not being displayed, select 'Refresh' to update the partition layout.