Using Microsoft Volume Shadow Copy Service (VSS) Macrium Reflect creates point-in-time persistent images of your system. In Addition to creating backups of all partitions required to backup and restore Windows, you can backup all or selected drives and partitions on the PC.
Starting the Image Wizard
The Image Wizard can be started in multiple ways...
-
By selecting Image selected disks on this computer.
Using this option will populate the Image Wizard with all selected disks and partitions in the application main window.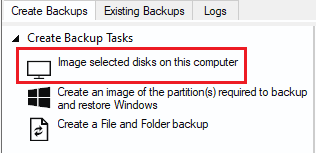
-
By selecting Create an image of the partition(s) required to backup and restore Windows.
Using this option will choose all the partitions required to boot Windows. This may include hidden system partitions that are essential for Windows to start and run.
See: Windows Partitions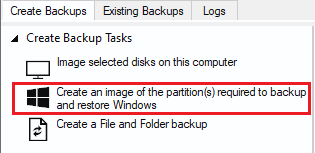
-
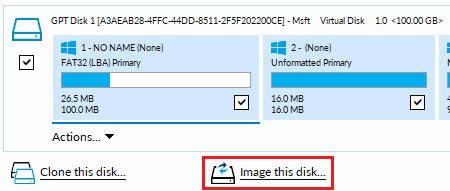
By Selecting a disk in the application main Window and click Image this disk....
-
By Selecting a disk in the application main Window, click on a partition, then click Actions and select Image this partition only...

Setting the Image destination
The first page of the Image Wizard shows the selected disks and partitions to be included in your Image and allows you to choose a destination.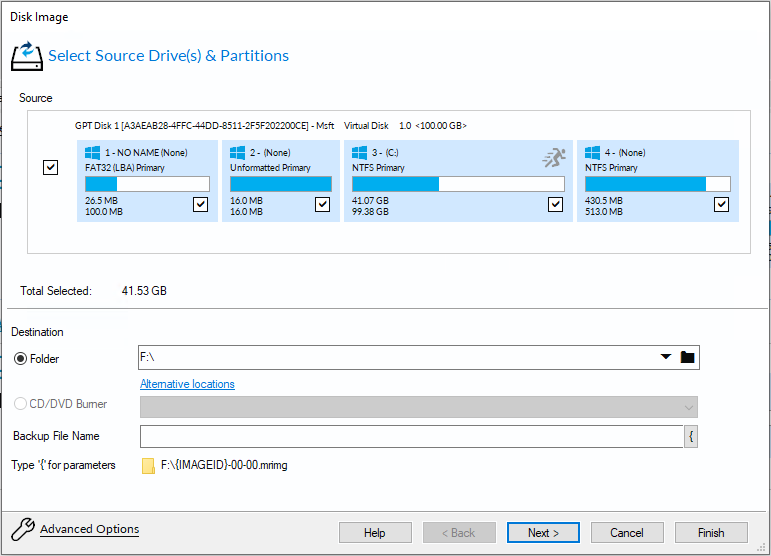
In the Destination section, enter the target backup folder.
You can type the destination path or click the browse button to choose a folder. The destination path can be on a local drive or network share.
Alternative Locations can be used to provide backup rotations or as a fail-safe for temporary unavailability of the primary backup destination.
Note: You cannot enter a path that is located in any of the partitions included in the Image.
In the Image and File and Folder backup dialog simply type '{' or press the '{' button at the end of the file name edit field: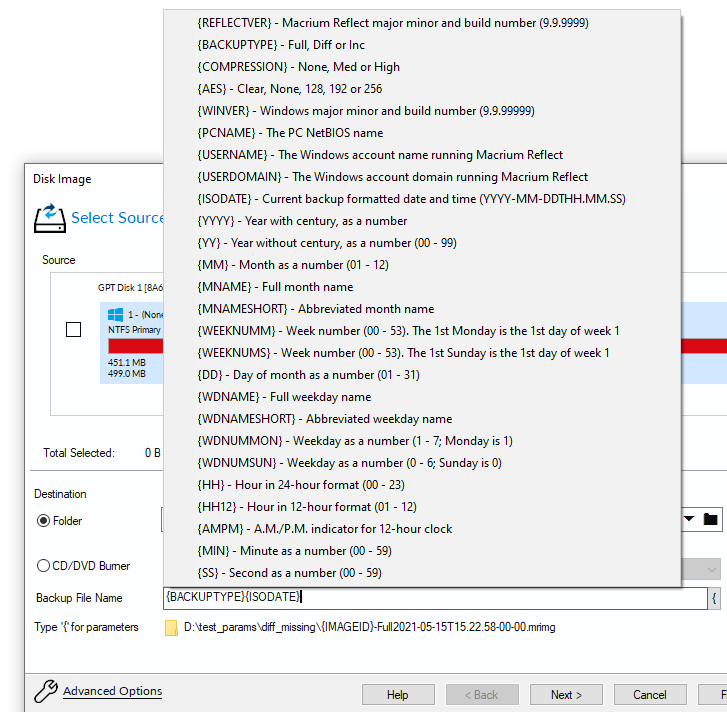
The selected parameter from the pop-up menu will be inserted into the file name at the edit position.
All parameters are evaluated at run time, and an example of the output is shown in the formatted file name and path below the edit field.
Note: The File name 'Set prefix' (IMAGEID above) is evaluated based on the backup set and isn't selectable from the parameters list.
Note: The timestamp used for the time fields may differ by a few seconds to the backup time recorded for the backup. This is because the backup file name is created before the completion of the Volume Snapshot and the actual backup start time.
|
Parameter
|
Description
|
|---|---|
| {REFLECTVER} | Macrium Reflect major minor and build number (9.9.9999) |
| {BACKUPTYPE} | Full, Diff or Inc |
| {COMPRESSION} | None, Med or High |
| {AES} | Clear, None, 128, 192 or 256 Where 'Clear' is no password and 'None' is password with no AES |
| {WINVER} | Windows major minor and build number (9.9.99999) |
| {PCNAME} | The PC NetBIOS name |
| {USERNAME} | The Windows account name running Macrium Reflect |
| {USERDOMAIN} | The Windows account domain running Macrium Reflect |
| {ISODATE} | Current backup formatted date and time (YYYY-MM-DDTHH.MM.SS) |
| {YYYY} | Year with century, as a number |
| {YY} | Year without century, as a number (00 - 99) |
| {MM} | Month as a number (01 - 12) |
| {MNAME} | Full month name |
| {MNAMESHORT} | Abbreviated month name |
| {WEEKNUMM} | Week number (00 - 53). The 1st Monday is the 1st day of week 1 |
| {WEEKNUMS} | Week number (00 - 53). The 1st Sunday is the 1st day of week 1 |
| {DD} | Day of month as a number (01 - 31) |
| {WDNAME} | Full weekday name |
| {WDNAMESHORT} | Abbreviated weekday name |
| {WDNUMMON} | Weekday as a number (1 - 7; Monday is 1) |
| {WDNUMSUN} | Weekday as a number (0 - 6; Sunday is 0) |
| {HH} | Hour in 24-hour format (00 - 23) |
| {HH12} | Hour in 12-hour format (01 - 12) |
| {AMPM} | A.M./P.M. indicator for 12-hour clock |
| {MIN} | Minute as a number (00 - 59) |
| {SS} | Second as a number (00 - 59) |
Please see How backup sets are created and maintained for more information on backup file naming.
Click Next. to edit the backup plan for this image or click Finish to save and/or run the Image now.
Adding and Editing the Backup Plan
The second page of the Image Wizard is where you create or edit your backup plan. This defines the backup schedules and retention rules for your backup.
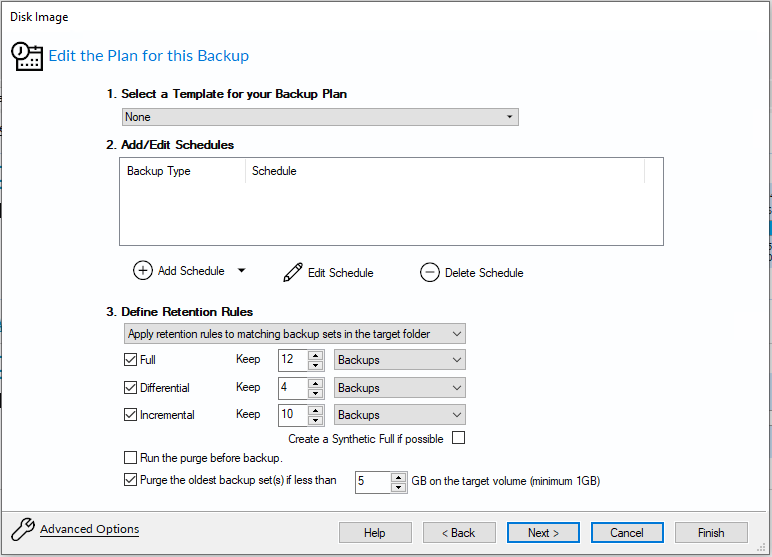
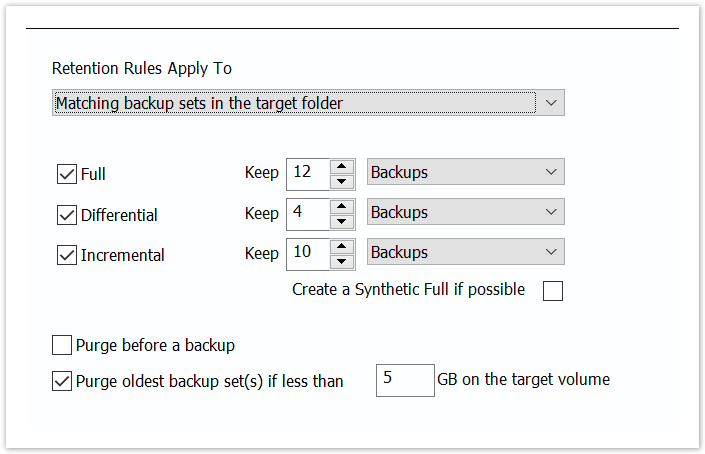
Choose how backups are matched, and how retention rules are applied to the target folder
Retention rules are applied to the target folder of the backup by selecting one of two options:
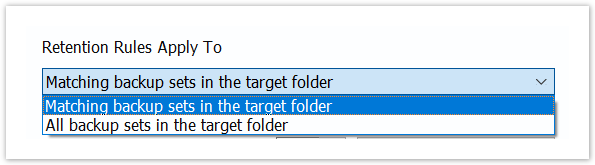
| Similar backup sets in the target folder. |
Disk Images are purged if they contain exactly the same Partitions as the current Image. Partitions are identified using the unique Disk ID stored in sector 0 of the disk and the Partition sector offset. Note: For GPT disks the unique GPT disk GUID is used instead of the Disk ID For File and Folder backups retention rules are applied according to the File and Folder 'Backup Set Matching' selection. |
| All backup sets in the target folder. | All backup sets in the target folder of the same type (Disk Image or File and Folder) are purged according the retention rules. |
Select the age or number of backup types that you wish to keep
|
Option |
Description |
|||||||||||||||||||||||||||||||||||||||||||||||||||
|---|---|---|---|---|---|---|---|---|---|---|---|---|---|---|---|---|---|---|---|---|---|---|---|---|---|---|---|---|---|---|---|---|---|---|---|---|---|---|---|---|---|---|---|---|---|---|---|---|---|---|---|---|
| Full | When deleting Full backups all linked incremental and Differential backups in the same backup chain (set) are also deleted This operation will delete the entire backup set. | |||||||||||||||||||||||||||||||||||||||||||||||||||
| Differential | When deleting Differential backups all linked incremental backups in the same backup chain (set) are also deleted. | |||||||||||||||||||||||||||||||||||||||||||||||||||
| Incremental |
When deleting Incremental backups the integrity of the backup set is maintained by ensuring that the chain is never broken. This is achieved by merging older Incremental backups when required. In the example below, before retention, there is 1 Full backup, 1 Differential backup and 6 Incremental backups. The retention rules are set to retain 4 incremental backups. After retention, the most recent 4 incremental backups are retained. Deleting the oldest 2 incrementals would cause the backup chain to be invalid as the oldest retained incremental requires the previous 2 incremental backups to complete the chain. To ensure backup integrity the 2 older incremental backups are consolidated with it to create a new incremental backup.
|
|||||||||||||||||||||||||||||||||||||||||||||||||||
| Create a Synthetic Full if possible |
When purging Incremental backups, if the backup set only contains a Full backup followed by Incremental backups, then this option causes the Full backup to be 'rolled forward' to create a Synthetic Full backup. This is also known as Incremental Forever. |
|||||||||||||||||||||||||||||||||||||||||||||||||||
| Run the purge before the backup |
Select this option to run the retention rules before the current backup. |
|||||||||||||||||||||||||||||||||||||||||||||||||||
| Delete oldest backup set(s) if less than n GB |
Automatically remove the oldest backup set(s) in the target folder if the free space on the drive drops below the GB threshold. |
Click Next to view a summary of all settings for this image or click Finish to save and/or run the Image now.
Displaying the Image settings
The final page of the Image Wizard displays all settings used for creating this image.
 Click Finish to Run and/or save your Image definition.
Saving the backup definition
You are now given the opportunity to save the backup options.

|
Option
|
Description
|
|---|---|
| Run this backup now | Create a 'Full' backup now using the backup definition |
| Run in Background |
If enabled, the backup task will run in the background. The task will be 'queued' if there is already a task running. Note: To see currently running background tasks, and the background task queue, click the 'Tasks Status' tab:
 The Task Status tab shows list of active Scheduled backups and user run background job all in one place. Tasks can be moved in the queue using the 'Move Up' and 'Move Down' toolbar buttons and context menu. Use the 'Delete' button or context menu to remove a background task from the queue. |
| Save to an XML file |
Saving your definition enables you to:
|
| Name for this backup definition | Enter a meaningful name for this definition |
|
|
Choose a folder to save the XML definition to. Note: Always save your definition to a local drive and never to a password-protected network share.
|
See also: Manually running a job from a configured XML backup definition
Best practices for saving Macrium Reflect backup definition and script files
Regardless of your PC environment, leaving your backup definition files in an insecure location is bad practice. The effort required to ensure your files are secure is minimal and doesn't impede day to day usage of Macrium Reflect.
What's the problem?
Backup definition (.xml) files are used to initiate backups either interactively by using Macrium Reflect directly, or as scheduled tasks using the Windows Tasks Scheduler. If you save your backup definitions to a publicly accessible folder then these can be edited by standard users and could potentially compromise your system. In addition, it's also possible to create batch files, either MS-DOS, PowerShell or VBScript, to automatically run during your backups as described here. A restricted user with bad intentions could easily create a batch file to run with elevated privileges when a scheduled or interactive backup runs.
The default, and recommended, location for your backup definitions is folder 'C:\users\<USER NAME>\documents\reflect'. When running Reflect for the first time this location is created and defaulted when saving. See Backup Save Options for more information on how to save your definitions.
This folder is automatically restricted for standard users and can only be accessed by Administrators and the local SYSTEM account.
To see assigned NTFS permissions right click on any folder, select 'Properties' and click the 'Security' tab: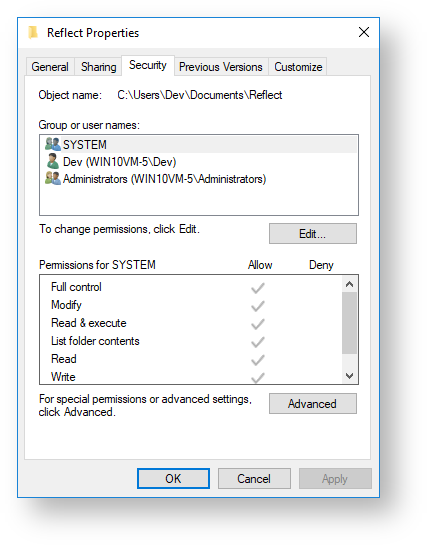
In the above example only SYSTEM, Dev (the Macrium Reflect user) and the Administrators group can access files contained in the folder. Standard users are denied access and cannot modify or create files.
We strongly recommend that, if not using the default location. you ensure that NTFS permissions are used to prevent unauthorised modification and creation of files in your backup definition folders.
For more information on setting NTFS permissions for folders and files please see Microsoft TechNet - How IT works NTFS Permissions
Note: A popular misconception is that backup definition files should be saved to the same folder as your backup files. This is incorrect. Backup definitions are only required to create backups and have no other purpose. They are not required for restore.
If you want to run the backup at this point, select Run this backup now and click OK:
