- Overview
- Restoring Images to the same Hardware using the Rescue Media
- Accessing Images Stored Locally
- Accessing Images Located on Network Shares
- Restoring Images to Dissimilar Hardware using the Rescue Media
Overview
If a computer cannot boot into Windows, e.g. Windows failing to boot or hardware failure, a user will not be able to access Macrium Reflect LTSC installed within Windows to initiate a restore.
In these cases another way to restore the system is required, this is where the rescue media is used. This is a bootable environment that can be used to boot a system and perform a recovery, even when Windows can't boot. This article contains more information about creating the rescue media.
Restoring Images to the same Hardware using the Rescue Media
First, the system where the restore will be performed should be booted using the rescue media, whether this is restoring to the same hardware, in the case of Windows not booting, or new hardware in the event of a hardware failure. If you are performing a bare metal restore to new hardware, additional drivers may be required; read more about driver management when creating the rescue media here.
Accessing Images Stored Locally
The rescue media will start on the 'Existing Backups' page. The rescue media will display any images that are found in the recent backup destination paths:

Additional paths can be added to the list, and searched for image files, using the 'Edit' button. In the window that opens, enter the path to the image and then select 'Add to list'.

After selecting 'OK' any images found in the path will be displayed in the 'Existing Backups' tab.
Alternatively, image files can be found using Windows Explorer included with the rescue media. Selecting 'Browse for an image file...' will open an Explorer window.

In the Explorer window, navigate to where the image file(s) are located, select the image that will be restored then select 'OK':

The image and any other images that are part of the same backup set will be loaded into the 'Existing Backups' tab.
Accessing Images Located on Network Shares
To access an image stored on a network share, the share will first need to be mapped. To do this, select 'Browse for an image file...' then select the 'Map Network Drive' icon in the Explorer window that opens:

In the window that opens, the location to the share and credentials that will be used to access the share can be entered:

|
Option
|
Description
|
|---|---|
| \\Server\share | Enter the UNC path to the root of the network share. Do not enter any sub-folders in the path |
| User name | Enter the authenticated user that has at least read access to the share. Domain credentials can be entered in the Domain\Username and Username@domain.com formats. |
| Password | Enter the password for the account was entered in the 'User name' field. |
After selecting 'OK', the share will be mapped and accessible through Explorer:

In the Explorer window, navigate to where the image file(s) are located, select the image that will be restored then select 'OK':

The image and any other images that are part of the same backup set will be loaded into the 'Existing Backups' tab.
Restore Wizard
To launch the image restore wizard, select the image that will be restored, then select 'Restore':

When restoring incremental and differential images, only the image that you want to restore needs to be selected. Macrium Reflect will automatically handle previous backups in the set, meaning that images can be restored in a single pass.
In the window that opens, the currently selected source disk contained in the image and the currently selected destination disk will be displayed.

| Option | Description | |
| Select a different source disk... |
If the disk image contains multiple disks, this option enables a different source disk to be selected. Note: When restoring multiple disks, disks must be restored one at a time. |
|
| Select a different target disk... | If the system where the restore is being performed contains multiple disks, this option can be used to change the disk that will be used as a destination for this restore. | |
| Copy Partitions | Shrink or extend to fill the target disk | If the destination disk is a different size from the source disk, selecting 'Copy Partitions' will display this option. Selecting this option will automatically resize partitions to use all unpartitioned space on a larger disk, or fit a smaller disk. |
| Exact partition offset and length | If the destination disk is a different size from the source disk, selecting 'Copy Partitions' will display this option. This option will copy the partitions to the same location on the destination disk, they will also retain their original size. | |
| Erase Disk | Erases any partitions that are located on the destination disk in the wizard. The disk will not actually be erased until the restore starts. | |
| Delete Partition | Deletes the selected partition on the destination disk in the wizard. The partition will not actually be deleted until the restore starts. | |
| Undo | Undo the last activity. | |
| Float Left | This moves the partition to the left-most unpartitioned space on the destination disk. | |
| Float Right | This moves the partition to the right-most unpartitioned space on the destination disk. | |
| Fill Space | Expand the partition to use all unpartitioned space to the right of the partition. | |
| Layout | Opens the 'Partition Properties' window for more granular control over partition properties. | |
More information about modifying the destination partition properties can be found in this article.
Once you are happy with the layout and properties of the partitions on the destination disk, select 'Next':

The final page of the wizard contains a summary of the restore that will take place, providing a chance to navigate back to previous pages of the wizard and make changes to the settings that have been specified. Select 'Finish' to start the restore:

If the restore requires partitions to be deleted/overwritten, you will be prompted to confirm overwrite:

The restore is a destructive process, any data on the partitions shown in the window will be deleted. It is important to ensure that you are happy to overwrite the selected partitions before selecting 'Continue...'.
The restore will then begin with the progress being displayed in the window that opens:

By default, the computer will automatically reboot once the restore has been completed.
Restoring Images to Dissimilar Hardware using the Rescue Media
The steps to perform the image restore to dissimilar hardware are the same as described above, however, there is an additional step to run Macrium ReDeploy once the restore has finished.
What is ReDeploy?
ReDeploy makes the complex process of getting an off-line Windows operating system running, as easy and intuitive as possible. ReDeploy detects changes to critical system features, locates relevant drivers, and injects them into your Windows operating system so it boots correctly.
It does not, however, install the complete driver set for the new hardware. ReDeploy ensures that the restore operating system is bootable on new hardware, additional driver installation for non-boot critical devices such as network and graphics adapters can be performed from within Windows on the new hardware.
Using ReDeploy
Macrium ReDeploy is run from the 'Existing Backup Tasks' menu on the 'Existing Backups' tab of the rescue media.

To avoid unnecessary and potentially time-consuming, system restarts, the 'After Restore' action can be changed to 'Not Set' once the restore has started:

ReDeploy Wizard
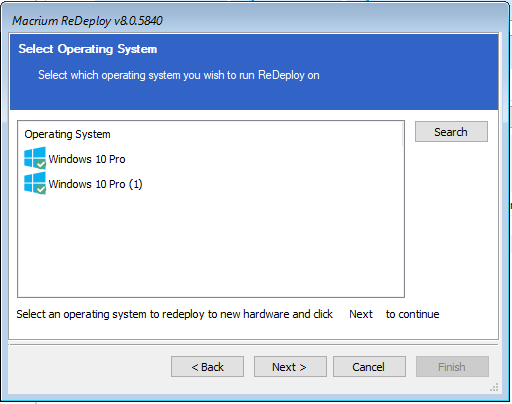
The first page of the ReDeploy wizard will display the operating systems that have been found on the system. In the majority of use cases (single boot systems), only one operating system will be shown in the list. However, in multi-boot systems, multiple operating systems may be present, this page can be used to select the operating system that ReDeploy will run on:
The next page of the wizard is used to specify locations that will be searched for compatible drivers:

Macrium ReDeploy will search the user-specified locations for compatible drivers; if locations have been specified by the user or no matching drivers are found, then ReDeploy will search removable devices like driver CD/DVDs and USB drives. ReDeploy will also search through Windows' database of drivers.
The next page of ReDeploy will display the discovered mass storage devices and whether a compatible driver has been found for the device:
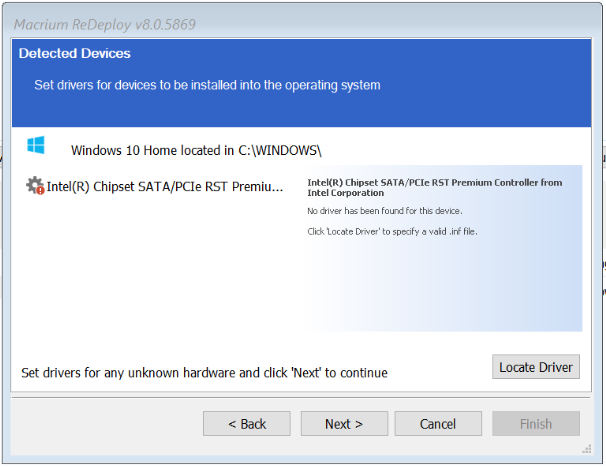
There are three possibilities for the mass storage devices shown on this page:
| The driver is already installed. The driver may still need to be enabled at boot, ReDeploy does this automatically. |
| A compatible driver has been located, either from a CD, user-specified location, or from the Windows database. This driver is installed on completion of ReDeploy. |
| No matching driver is located. |
If no driver is located, or you choose to override the displayed driver, then use Locate Driver to manually specify a .inf file. If you have multiple mass storage interfaces in your system, you only need to locate drivers for hardware that contains the Windows operating system.
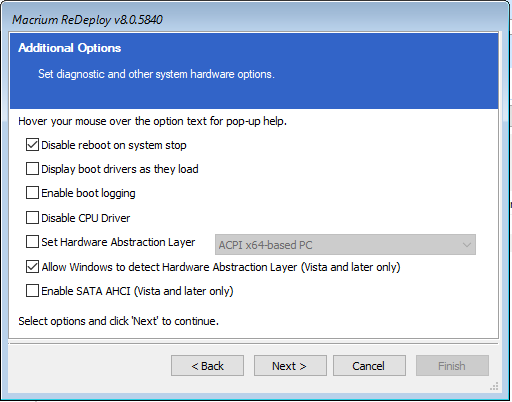
The final page of the ReDeploy wizard contains additional options. Where possible, it is recommended that these options are left as default, unless troubleshooting particular boot issues or as directed by the Macrium Support Team:
|
Option
|
Description
|
|---|---|
| Disable reboot on system stop | Set this option to stop automatic rebooting if a blue screen of death (BSOD) occurs while Windows is loading or running. If this option is not set and Windows generates a BSOD, there will be no time to note the BSOD error codes. |
| Display boot drivers as they load | Set this option to show which drivers are being loaded as Windows loads. Once Windows is loading and running without issue this option can be reverted using the Windows MSCONFIG utility. You can use the Pause/Break key to freeze the list as it scrolls past, use space to un-pause. |
| Enable boot logging | Set this option to log drivers being loaded by Windows as it loads. The resulting log file 'ntblog.txt' can be found in the windows folder. Once Windows is loading and running without issue this option can be reverted using the Windows MSCONFIG utility. |
| Disable CPU Driver | Set this option to disable CPU drivers. This may be useful if you see BSOD's in the selected HAL drivers or system lockup on entering standby or shutdown. |
| Set Hardware Abstraction Layer | Set this option to choose which Hardware Abstraction Layer is to be used in the selected Windows operating system. The recommended HAL for this machine is the one initially selected. If you have the incorrect HAL configured, your Windows installation is unstable and can cause random BSOD's or lock ups after Windows boots. In particular, if you are redeploying from or to Virtual Box with an advanced programmable interrupt controller (APIC) unchecked (the default) or very old physical hardware, set a new HAL. |
| Allow Windows to detect Hardware Abstraction Layer |
Set this option to allow Windows to determine the best Hardware Abstraction Layer to use at boot time. This is a Vista and later only option.
|
| Enable SATA AHCI |
Set this option to enable support for generic SATA AHCI hardware. You will typically also need to enable an option in your BIOS for your mass storage hardware to operate in this mode. This is a Vista and later only option. |
A final confirmation page will then be displayed, click 'Finish' to run ReDeploy:
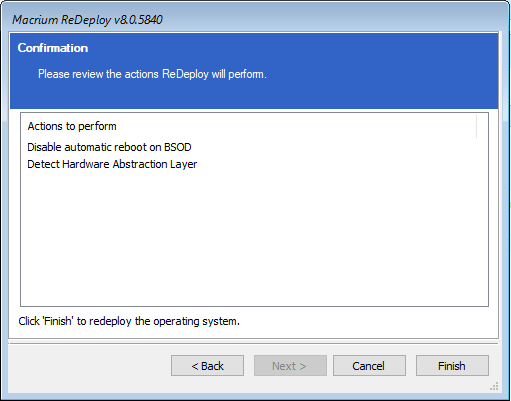
Once ReDeploy has been run, you will be prompted to 'Close' ReDeploy, if there are additional actions that need to be performed in the rescue media, or 'Reboot' to reboot into the restored operating system.
